
Build an ESP32 energy meter with a PZEM-004T v3.0 module that shows voltage, current, power, kWh and bill on an OLED and a Wi-Fi web dashboard. Wiring, diagram and full code.
Need it ready-made? Buy Ready Project
This ESP32 energy meter measures how much electricity an appliance or a whole room uses. A PZEM-004T v3.0 module reads the mains voltage, current, power, energy in kWh, frequency and power factor, and the ESP32 shows them on a small OLED screen and on a live web dashboard that opens on any phone connected to your Wi-Fi.
It also estimates your electricity bill from the units used, so you can see what your fridge, geyser or AC really costs to run. A JSON endpoint lets you log the data in Home Assistant, Node-RED or a spreadsheet.
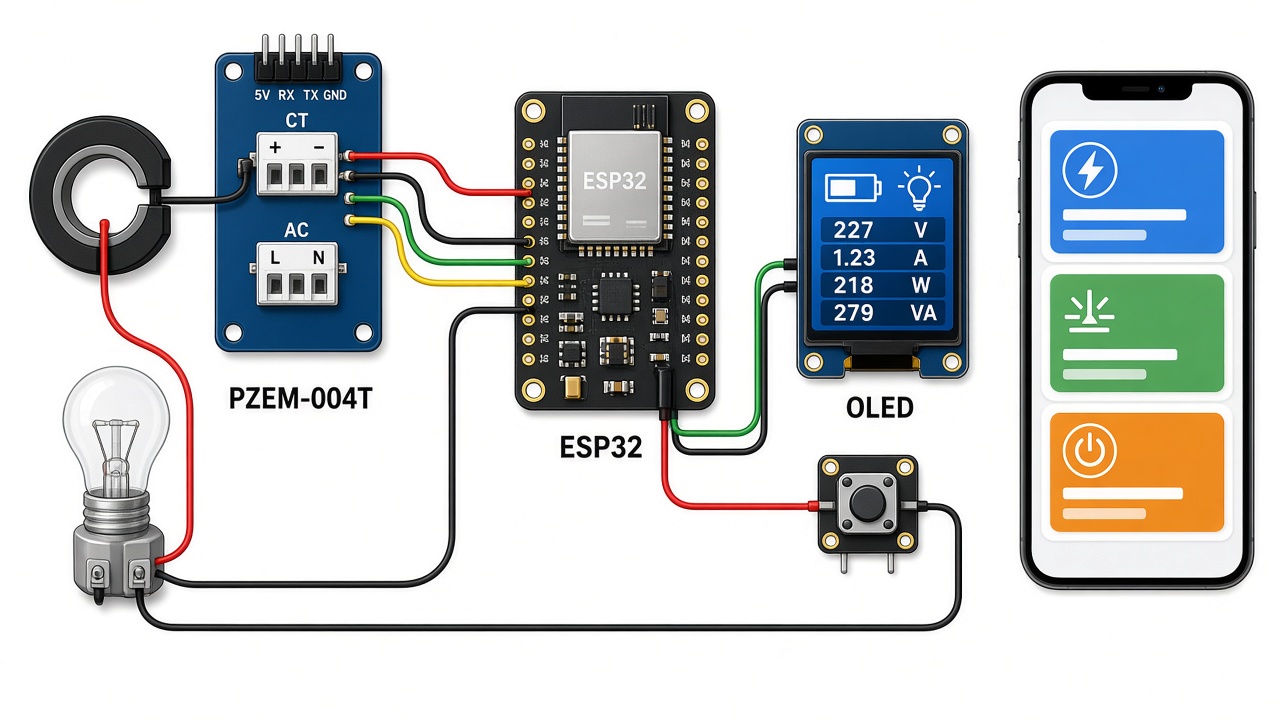
How It Works
- Measurement: the PZEM-004T senses voltage directly from its L and N terminals and current through its CT (current transformer) coil clamped around the live wire. Its own chip calculates power, energy, frequency and power factor and keeps the kWh count even when the ESP32 restarts.
- Communication: the module talks Modbus RTU over a TTL serial port at 9600 baud. The ESP32 uses its second hardware serial port (UART2 on GPIO16 and GPIO17) so the USB serial monitor stays free for debugging.
- Display: once per second the ESP32 reads all six values and draws them on the 0.96 inch SSD1306 OLED, with the power in large digits and a HIGH LOAD warning above 2000 W.
- Web dashboard: the ESP32 runs a small web server. Open its IP address in a browser to see six live tiles that refresh every 3 seconds, the estimated bill, and a button to reset the kWh counter.
/jsonreturns the same data for other software. - Reset button: holding the push button on GPIO4 for 3 seconds clears the energy counter stored in the PZEM module, for example at the start of each billing month.
Components Required
- ESP32 development board (ESP32 Dev Module / DevKit V1) – 1
- PZEM-004T v3.0 module with 100 A split or closed CT coil – 1
- 0.96 inch SSD1306 I2C OLED (128×64) – 1
- Push button – 1
- 5 V USB power adapter and micro-USB cable
- Jumper wires, plastic enclosure, screw terminals
- Mains cable with plug and socket for the load you want to measure
Wiring Table
| From | To | Notes |
|---|---|---|
| PZEM 5V | ESP32 VIN (5V) | Powers the PZEM TTL interface |
| PZEM GND | ESP32 GND | |
| PZEM TX | ESP32 GPIO16 (RX2) | Serial data from meter |
| PZEM RX | ESP32 GPIO17 (TX2) | Serial data to meter |
| OLED VCC | ESP32 3V3 | |
| OLED GND | ESP32 GND | |
| OLED SDA | ESP32 GPIO21 | |
| OLED SCL | ESP32 GPIO22 | I2C address 0x3C |
| Push button leg 1 | ESP32 GPIO4 | Internal pull-up, hold 3 s to reset kWh |
| Push button leg 2 | ESP32 GND | |
| PZEM L / N terminals | Mains Live / Neutral | 230 V AC, power OFF while wiring |
| CT coil | Around the LIVE wire to the load | Only one wire passes through the coil |
Connection Diagram
The illustration above shows the general layout. The pin-accurate drawing below matches the wiring table exactly, so follow it when you build the circuit.
Safety First
- The L and N terminals of the PZEM-004T are connected to 230 V mains. Make all connections with the main switch OFF and the plug removed.
- Put the PZEM module and its mains terminals inside a closed plastic box. Never touch the board while it is powered from mains.
- Pass only the live wire through the CT coil. If both live and neutral pass through it, the current cancels out and reads zero.
- If you are not comfortable with mains wiring, ask a qualified electrician to do the mains side.
Code
In the Arduino IDE install the ESP32 board package and these libraries from the Library Manager: PZEM004Tv30 (by Jakub Mandula), Adafruit SSD1306 and Adafruit GFX. Choose ESP32 Dev Module as the board, replace the Wi-Fi placeholders, set your tariff in COST_PER_KWH, and upload.
/*
  ESP32 Energy Meter with PZEM-004T v3.0, OLED and Web Dashboard
  ---------------------------------------------------------------
  - Reads voltage, current, power, energy (kWh), frequency and power factor
    from a PZEM-004T v3.0 module over Modbus (UART2: GPIO16 RX, GPIO17 TX).
  - Shows live values on a 0.96" SSD1306 I2C OLED (SDA GPIO21, SCL GPIO22).
  - Serves a web dashboard on your Wi-Fi with auto-refresh and a JSON API.
  - Push button on GPIO4 (hold 3 s) or the web button resets the kWh counter.
  - Estimates the bill using your price per unit (edit COST_PER_KWH).

  Libraries: PZEM004Tv30 (by Jakub Mandula), Adafruit SSD1306, Adafruit GFX.
  Board: ESP32 Dev Module.
*/
#include <WiFi.h>
#include <WebServer.h>
#include <Wire.h>
#include <Adafruit_GFX.h>
#include <Adafruit_SSD1306.h>
#include <PZEM004Tv30.h>

// ---------- User settings ----------
const char* WIFI_SSID     = "YOUR_WIFI_SSID";      // placeholder
const char* WIFI_PASSWORD = "YOUR_WIFI_PASSWORD";  // placeholder
const float COST_PER_KWH  = 7.0;    // your electricity tariff per unit (kWh)
const float POWER_ALERT_W = 2000.0; // OLED shows "HIGH LOAD" above this

// ---------- Pins ----------
#define PZEM_RX_PIN 16   // ESP32 RX2  <- PZEM TX
#define PZEM_TX_PIN 17   // ESP32 TX2  -> PZEM RX
#define RESET_BTN   4    // push button to GND (internal pull-up)

PZEM004Tv30 pzem(Serial2, PZEM_RX_PIN, PZEM_TX_PIN);
Adafruit_SSD1306 display(128, 64, &Wire, -1);
WebServer server(80);

// Latest readings (NAN means "no reading")
float voltage = NAN, current = NAN, power = NAN, energy = NAN, freq = NAN, pf = NAN;
unsigned long lastRead = 0;
unsigned long btnPressedAt = 0;

// Read every value from the PZEM module
void readPzem() {
  voltage = pzem.voltage();
  current = pzem.current();
  power   = pzem.power();
  energy  = pzem.energy();
  freq    = pzem.frequency();
  pf      = pzem.pf();
  if (isnan(voltage)) {
    Serial.println("PZEM not responding - check wiring and mains connection");
  } else {
    Serial.printf("V=%.1f I=%.3f P=%.1f E=%.3f F=%.1f PF=%.2f\n",
                  voltage, current, power, energy, freq, pf);
  }
}

// Draw the readings on the OLED
void drawOled() {
  display.clearDisplay();
  display.setTextColor(SSD1306_WHITE);
  display.setTextSize(1);
  display.setCursor(0, 0);
  if (isnan(voltage)) {
    display.println("PZEM-004T");
    display.println("No reading.");
    display.println("Check wiring/mains.");
  } else {
    display.setTextSize(2);
    display.printf("%.0fW\n", power);          // big power value
    display.setTextSize(1);
    display.printf("%.1fV  %.2fA\n", voltage, current);
    display.printf("%.3f kWh\n", energy);
    display.printf("PF %.2f  %.1fHz\n", pf, freq);
    display.printf("Bill: Rs %.2f\n", energy * COST_PER_KWH);
    if (power > POWER_ALERT_W) display.print("!! HIGH LOAD !!");
  }
  // Small Wi-Fi indicator in the top right corner
  display.setTextSize(1);
  display.setCursor(104, 0);
  display.print(WiFi.status() == WL_CONNECTED ? "WiFi" : "----");
  display.display();
}

// Helper: number to text, "--" when the value is missing
String num(float v, int digits) {
  return isnan(v) ? String("--") : String(v, digits);
}

// Web dashboard page (refreshes itself every 3 seconds)
void handleRoot() {
  String html = F("<!DOCTYPE html><html><head><meta name='viewport' content='width=device-width,initial-scale=1'>"
                  "<meta http-equiv='refresh' content='3'><title>ESP32 Energy Meter</title>"
                  "<style>body{font-family:Arial;background:#f4f6f8;text-align:center}"
                  ".g{display:grid;grid-template-columns:repeat(2,1fr);gap:10px;max-width:420px;margin:auto}"
                  ".c{background:#fff;border-radius:10px;padding:14px;box-shadow:0 1px 4px #0002}"
                  ".v{font-size:26px;font-weight:bold;color:#1565c0}button{margin-top:16px;padding:10px 18px}</style>"
                  "</head><body><h2>ESP32 Energy Meter</h2><div class='g'>");
  html += "<div class='c'>Voltage<div class='v'>" + num(voltage, 1) + " V</div></div>";
  html += "<div class='c'>Current<div class='v'>" + num(current, 3) + " A</div></div>";
  html += "<div class='c'>Power<div class='v'>" + num(power, 1) + " W</div></div>";
  html += "<div class='c'>Energy<div class='v'>" + num(energy, 3) + " kWh</div></div>";
  html += "<div class='c'>Frequency<div class='v'>" + num(freq, 1) + " Hz</div></div>";
  html += "<div class='c'>Power factor<div class='v'>" + num(pf, 2) + "</div></div>";
  html += "</div><p>Estimated bill: <b>Rs " + num(isnan(energy) ? NAN : energy * COST_PER_KWH, 2) + "</b></p>";
  html += F("<form action='/reset' method='POST' onsubmit=\"return confirm('Reset kWh counter?')\">"
            "<button>Reset energy counter</button></form></body></html>");
  server.send(200, "text/html", html);
}

// JSON API for Home Assistant, Node-RED or a spreadsheet logger
void handleJson() {
  String j = "{\"voltage\":" + num(voltage, 1) + ",\"current\":" + num(current, 3) +
             ",\"power\":" + num(power, 1) + ",\"energy\":" + num(energy, 3) +
             ",\"frequency\":" + num(freq, 1) + ",\"pf\":" + num(pf, 2) + "}";
  j.replace("--", "null");
  server.send(200, "application/json", j);
}

// Reset the kWh counter stored inside the PZEM module
void handleReset() {
  bool ok = pzem.resetEnergy();
  Serial.println(ok ? "Energy counter reset" : "Energy reset failed");
  server.sendHeader("Location", "/");
  server.send(303);
}

void connectWiFi() {
  WiFi.mode(WIFI_STA);
  WiFi.begin(WIFI_SSID, WIFI_PASSWORD);
  Serial.print("Connecting to Wi-Fi");
  unsigned long start = millis();
  while (WiFi.status() != WL_CONNECTED && millis() - start < 15000) {
    delay(500);
    Serial.print(".");
  }
  Serial.println();
  if (WiFi.status() == WL_CONNECTED) {
    Serial.print("Dashboard: http://");
    Serial.println(WiFi.localIP());
  } else {
    Serial.println("Wi-Fi not connected, OLED still works. Will retry.");
  }
}

void setup() {
  Serial.begin(115200);
  pinMode(RESET_BTN, INPUT_PULLUP);

  if (!display.begin(SSD1306_SWITCHCAPVCC, 0x3C)) {
    Serial.println("OLED not found at 0x3C");
  }
  display.clearDisplay();
  display.setTextColor(SSD1306_WHITE);
  display.setCursor(0, 0);
  display.println("ESP32 Energy Meter");
  display.println("Connecting Wi-Fi...");
  display.display();

  connectWiFi();
  if (WiFi.status() == WL_CONNECTED) {
    display.println(WiFi.localIP());
    display.display();
    delay(2000);
  }

  server.on("/", handleRoot);
  server.on("/json", handleJson);
  server.on("/reset", HTTP_POST, handleReset);
  server.begin();
}

void loop() {
  server.handleClient();

  // Read the meter and refresh the OLED once per second
  if (millis() - lastRead >= 1000) {
    lastRead = millis();
    readPzem();
    drawOled();
  }

  // Hold the button for 3 seconds to reset the kWh counter
  if (digitalRead(RESET_BTN) == LOW) {
    if (btnPressedAt == 0) btnPressedAt = millis();
    if (millis() - btnPressedAt > 3000) {
      pzem.resetEnergy();
      Serial.println("Energy counter reset by button");
      btnPressedAt = 0;
      while (digitalRead(RESET_BTN) == LOW) delay(10);  // wait for release
    }
  } else {
    btnPressedAt = 0;
  }

  // Reconnect Wi-Fi every 30 s if the router dropped
  static unsigned long lastWifiTry = 0;
  if (WiFi.status() != WL_CONNECTED && millis() - lastWifiTry > 30000) {
    lastWifiTry = millis();
    WiFi.disconnect();
    WiFi.begin(WIFI_SSID, WIFI_PASSWORD);
  }
}
Testing
- Open the Serial Monitor at 115200 baud. It prints the dashboard address, for example http://192.168.1.50.
- With mains connected and no load, voltage should read about 220 to 240 V and current close to 0 A.
- Plug in a known load, such as a 100 W bulb or a 1000 W kettle, and check that the power reading is close to its rating.
- Open the dashboard on your phone and watch the tiles refresh every 3 seconds.
Troubleshooting
| Problem | Fix |
|---|---|
| OLED says No reading | The PZEM needs mains on its L and N terminals to answer. Also check that TX goes to GPIO16 and RX to GPIO17 (crossed). |
| Current reads 0 A with a load on | Make sure only the live wire passes through the CT coil and the coil plug is fully inserted. |
| Dashboard does not open | Check the IP in the Serial Monitor and that your phone is on the same Wi-Fi network. |
| Readings freeze sometimes | Use a good 5 V 1 A adapter and keep the serial wires short. |
Ideas to Extend
- Log the JSON data every minute to Google Sheets or InfluxDB and plot daily usage.
- Add a relay to switch off the load automatically when power goes above a limit.
- Use several PZEM modules with different Modbus addresses to monitor each circuit of the house.