
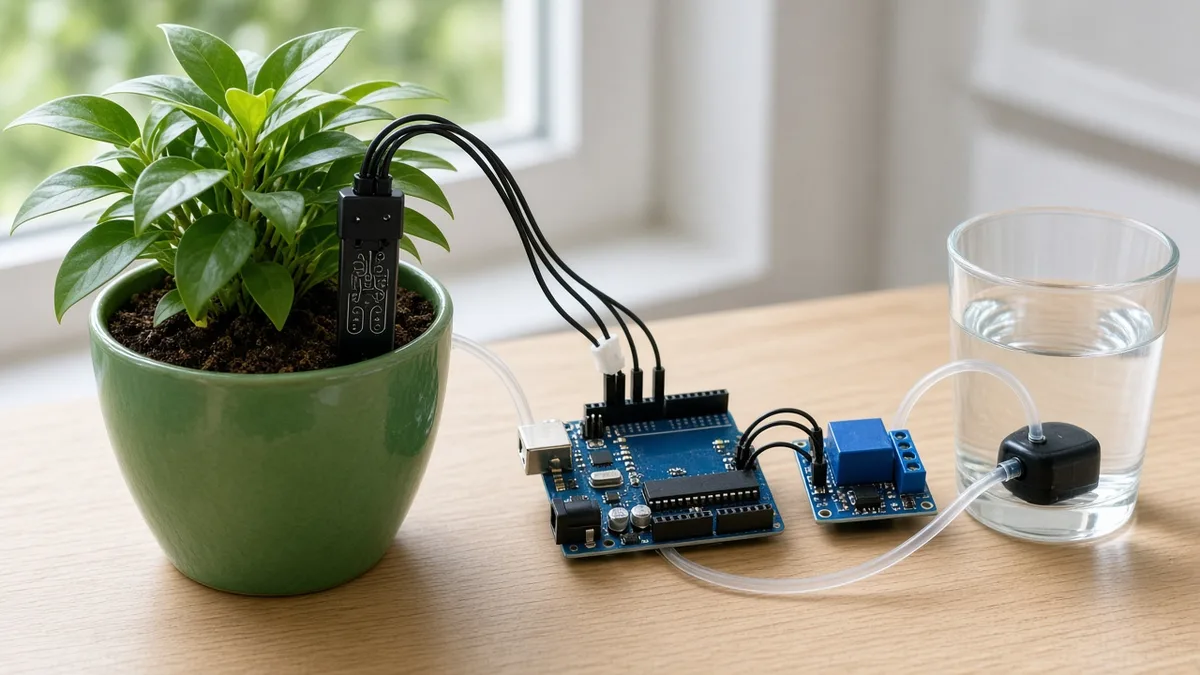
Build an automatic irrigation system with Arduino Uno, a capacitive soil moisture sensor, relay and pump. Calibration, wiring table, full code and FAQ.
Need it ready-made? Buy Ready Project
Going on holiday, or simply forgetting to water your plants? This automatic plant watering system with Arduino and a soil moisture sensor checks the soil every half second and switches on a small water pump only when the soil is dry. It stops as soon as the soil is moist enough, and it has two safety features most online versions skip: a maximum pump run time (so a broken sensor cannot flood your floor) and a soak delay that gives water time to spread before the next check.
How It Works
A capacitive soil moisture sensor acts like a capacitor whose value changes with the water content of the soil around it. Its on-board circuit converts this into an analog voltage: higher voltage when dry, lower when wet. The Arduino reads it on A0, converts it to a 0–100 % moisture value using two calibration points, and controls a relay that switches a 5 V DC submersible pump. The code uses hysteresis – start below 35 %, stop above 60 % – so the pump does not rapidly switch on and off around a single value.
We use the capacitive sensor (v1.2) instead of the two-prong resistive “YL-69” probe because resistive probes pass current through the soil and corrode within weeks.
Components Required
- Arduino Uno R3 – 1
- Capacitive soil moisture sensor v1.2 – 1
- 1-channel 5 V relay module – 1
- 3–6 V DC mini submersible pump with silicone tube – 1
- Separate 5 V power supply for the pump (or 4×AA battery pack)
- Water container, jumper wires, small screwdriver
Wiring Table (Pin-to-Pin)
| Module | Module Pin | Connect To | Notes |
|---|---|---|---|
| Soil sensor | VCC | Arduino 5V | Works on 3.3–5.5 V |
| Soil sensor | GND | Arduino GND | |
| Soil sensor | AOUT | Arduino A0 | SOIL_PIN = A0 |
| Relay module | VCC | Arduino 5V | |
| Relay module | GND | Arduino GND | |
| Relay module | IN | Arduino D7 | RELAY_PIN = 7 |
| Relay | COM | Pump supply + (5 V) | Pump power does not come from the Arduino |
| Relay | NO | Pump red (+) wire | Pump runs only when relay is ON |
| Pump | Black (−) | Pump supply − | Also connect supply − to Arduino GND only if your relay module needs a common ground |
Libraries
No external libraries are needed – the sketch uses only built-in Arduino functions (analogRead, map, constrain, millis). The code is original and written for this tutorial.
Calibrating the Sensor (Important)
- Upload any sketch that prints
analogRead(A0), or temporarily printrawin the code below. - Hold the sensor in dry air and note the value (typically 500–600). Put it in
DRY_VALUE. - Dip the sensor in a glass of water up to the line (never past the electronics) and note the value (typically 250–300). Put it in
WET_VALUE. - Upload the final code. 0 % now means your dry reading and 100 % your wet reading.
Complete Arduino Code
// Automatic Plant Watering System - Arduino Uno + Capacitive Soil Moisture Sensor + Relay + Pump
// No external libraries needed
const int SOIL_PIN  = A0;   // sensor AOUT
const int RELAY_PIN = 7;    // relay IN
const bool RELAY_ACTIVE_LOW = true;

// Calibrate these two values for YOUR sensor (see tutorial)
const int DRY_VALUE = 520;  // reading in dry air / dry soil
const int WET_VALUE = 260;  // reading in a glass of water

const int START_PUMP_BELOW = 35;  // % moisture: start watering
const int STOP_PUMP_ABOVE  = 60;  // % moisture: stop watering
const unsigned long MAX_PUMP_MS = 15000UL;  // safety: max 15 s per cycle
const unsigned long SOAK_MS     = 60000UL;  // wait 60 s for water to spread

bool pumpOn = false;
unsigned long pumpStart = 0, lastStop = 0;

void setPump(bool on) {
  pumpOn = on;
  digitalWrite(RELAY_PIN, (on != RELAY_ACTIVE_LOW) ? HIGH : LOW);
}

int readMoisturePercent() {
  long sum = 0;
  for (int i = 0; i < 10; i++) { sum += analogRead(SOIL_PIN); delay(5); }
  int raw = sum / 10;
  int pct = map(raw, DRY_VALUE, WET_VALUE, 0, 100);
  return constrain(pct, 0, 100);
}

void setup() {
  Serial.begin(9600);
  pinMode(RELAY_PIN, OUTPUT);
  setPump(false);
}

void loop() {
  int moisture = readMoisturePercent();
  unsigned long now = millis();

  if (!pumpOn && moisture < START_PUMP_BELOW && (lastStop == 0 || now - lastStop > SOAK_MS)) {
    setPump(true);
    pumpStart = now;
  } else if (pumpOn && (moisture > STOP_PUMP_ABOVE || now - pumpStart > MAX_PUMP_MS)) {
    setPump(false);
    lastStop = now;
  }

  Serial.print("Moisture: ");
  Serial.print(moisture);
  Serial.print("%  Pump: ");
  Serial.println(pumpOn ? "ON" : "OFF");
  delay(500);
}
Code Explanation
- readMoisturePercent() averages 10 readings to reduce noise, maps the raw value between your dry and wet calibration points, and clamps the result to 0–100 %.
- Hysteresis: the pump starts below 35 % and stops above 60 %. Change these for your plant (succulents like it drier, ferns wetter).
- MAX_PUMP_MS stops the pump after 15 seconds even if the sensor still says dry – this protects against a sensor that has fallen out of the pot.
- SOAK_MS waits 60 seconds after watering before the pump may start again, because water takes time to reach the sensor.
- setPump() supports both active-LOW and active-HIGH relay modules via
RELAY_ACTIVE_LOW.
Step-by-Step Instructions
- Wire the sensor and relay to the Arduino as in the table.
- Wire the pump circuit separately: supply + → relay COM, relay NO → pump +, pump − → supply −.
- Calibrate the sensor and update DRY_VALUE and WET_VALUE.
- Upload the code and open Serial Monitor at 9600 baud.
- Put the sensor in dry soil – the relay should click and the pump should run.
- Pour some water or move the sensor to wet soil – the pump stops once moisture is above 60 %.
- Place the pump in the water container and route the tube to the base of the plant. Push the sensor into the soil about 5 cm from the stem, up to the white line.
- Watch it for a full day and fine-tune the thresholds and MAX_PUMP_MS for your pot size.
Troubleshooting
| Problem | Fix |
|---|---|
| Moisture stuck at 0 % or 100 % | Calibration values wrong or swapped; re-measure dry and wet readings. |
| Arduino resets when pump starts | Pump is drawing current from the Arduino – use a separate supply for the pump. |
| Pump runs when it should be off | Relay is active-HIGH: set RELAY_ACTIVE_LOW = false. |
| Readings drift over days | Seal the top electronics of the sensor with hot glue or nail polish to keep water out. |
| Pump hums but no water | Pump must be fully submerged and primed; check the tube is not kinked. |
Upgrade Ideas
- Use an ESP32 to send moisture levels to your phone and get “tank empty” alerts.
- Add a float switch or ultrasonic sensor to stop the pump when the water tank is empty.
- Control several plants with multiple sensors and a 4-channel relay.
- Run it on a solar panel and battery for a balcony garden.
Frequently Asked Questions
Can I use the cheap resistive soil sensor?
Yes, the code works with it too, but resistive probes corrode quickly. If you use one, power it from a digital pin and turn it on only while reading.
How often does the plant get watered?
Only when moisture drops below 35 %. In practice that may be once a day or once a week, depending on the plant, pot and weather.
Can I power the pump from the Arduino 5V pin?
Not recommended – even small pumps draw 100–300 mA with large start-up spikes that can reset the Arduino. Use a separate supply.
Can I water multiple plants?
Yes. Use one sensor per pot (A0, A1, A2…) and one relay or a drip line with several outlets.
Related Projects
- Automatic Water Tank Controller with LM358 and 555
- Arduino Ultrasonic Distance Meter with HC-SR04 and LCD
- Arduino Clap Switch with KY-038 Sound Sensor
- ESP32 DHT11 Weather Station with Web Server
Browse more Arduino Projects on Arduino Project Hub.
3 thoughts on “Automatic Plant Watering System with Arduino and Soil Moisture Sensor”