
Build an Arduino Mega smart parking system with RC522 RFID entry, four IR slot sensors, a servo barrier and a 16×2 I2C LCD. Wiring table, diagram and full code.
Need it ready-made? Buy Ready Project
This Arduino Mega smart parking system runs a small car park on its own. Four IR sensors watch the parking bays, a 16×2 I2C LCD shows how many slots are free, and an SG90 servo lifts a barrier only when a registered RFID card is scanned at the entry. Cars leaving are let out automatically, and when every bay is taken the red LED lights and the display says PARKING FULL.
It is a big, combination project: RFID over SPI, an I2C display, a servo, and six IR sensors all work together in one sketch. The Arduino Mega 2560 (ATmega2560) is a good fit because it has plenty of spare pins, hardware SPI on pins 50–53 and I2C on pins 20–21, so nothing has to share a pin. It makes a great model for a school exhibition, an apartment gate demo or a college mini-project.
How the Smart Parking System Works
- Slot sensing: each bay has an IR obstacle sensor. When a car (or a toy car on a model) is above it, the module pulls its OUT pin LOW. The Mega reads pins D24–D27 and counts the free bays.
- Display: line 1 of the LCD shows Free slots: 3/4. Line 2 shows each bay as S1O (free) or S1X (occupied). The green LED is on while space is available and the red LED is on when the car park is full.
- Entry: when the entry IR sensor on D22 sees a car, the LCD asks for a card. The RC522 reader checks the card’s UID against a list in the code. A known card makes the servo on D9 raise the barrier; an unknown card gives a long beep and Access denied.
- Full car park: if no bays are free, the gate stays shut, the buzzer beeps twice and the LCD shows PARKING FULL, even if the card is valid.
- Exit: the exit IR sensor on D23 opens the gate with no card, so nobody gets trapped inside.
- Closing the gate: the barrier stays up until the car has passed the sensor, then waits 1.5 seconds and closes. A 15-second time-out closes it if the car never moves.
Components Required
- Arduino Mega 2560 (or a Mega 2560 compatible board) – 1
- MFRC522 (RC522) 13.56 MHz RFID reader with cards or key tags – 1 set
- 16×2 LCD with I2C backpack (PCF8574, address 0x27 or 0x3F) – 1
- SG90 micro servo (or MG90S for a heavier barrier) – 1
- IR obstacle sensor modules (FC-51 type) – 6 (2 for the gate, 4 for the bays)
- Green LED and red LED – 1 each, with 220 Ω resistors – 2
- Active 5 V buzzer – 1
- External 5 V, 2 A power supply for the servo (a USB charger with a cut cable or a buck converter works)
- USB cable for the Mega, breadboard, jumper wires, and a cardboard or foam-board base for the parking model
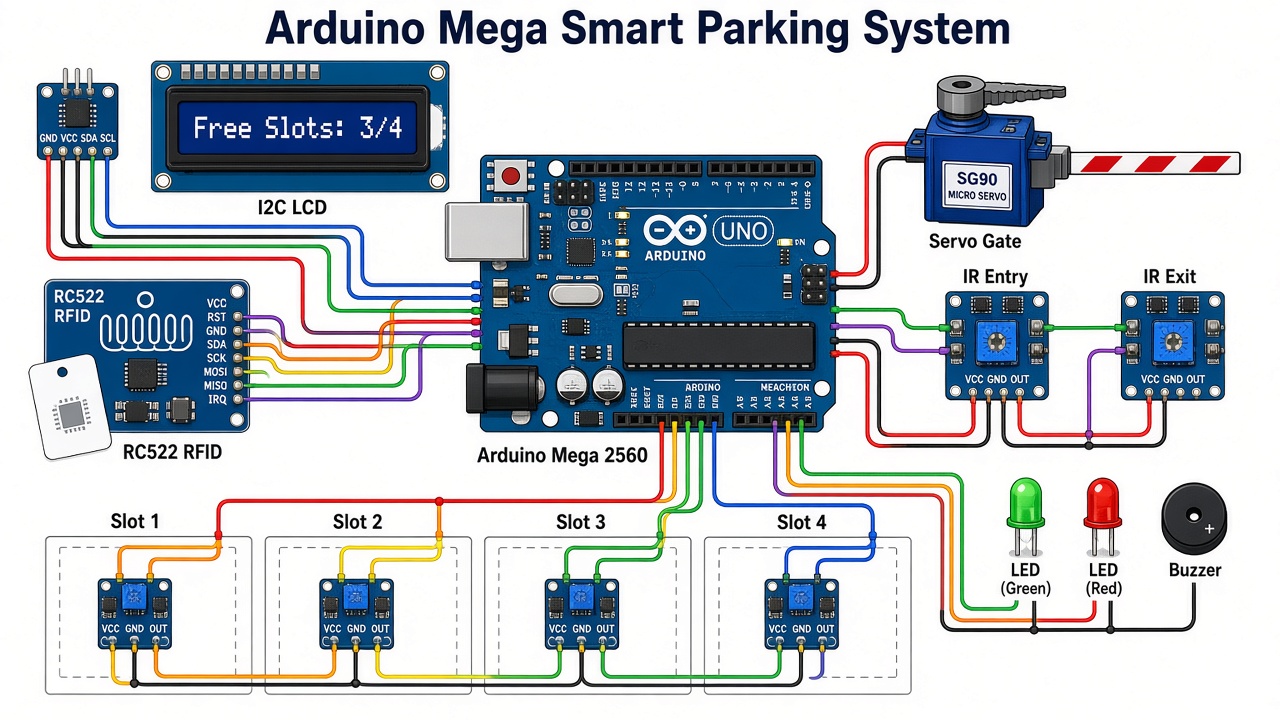
Wiring Table (Pin-to-Pin)
| Module | Module Pin | Arduino Mega Pin | Notes |
|---|---|---|---|
| RC522 RFID | SDA (SS) | D53 | Hardware SPI chip select |
| RC522 RFID | SCK | D52 | |
| RC522 RFID | MOSI | D51 | |
| RC522 RFID | MISO | D50 | |
| RC522 RFID | RST | D49 | |
| RC522 RFID | 3.3V / GND | 3.3V / GND | Never connect the RC522 to 5 V |
| RC522 RFID | IRQ | Not connected | |
| I2C LCD | SDA / SCL | D20 / D21 | Mega I2C pins (also on the SDA/SCL header) |
| I2C LCD | VCC / GND | 5V / GND | |
| SG90 servo | Orange (signal) | D9 | |
| SG90 servo | Red (+) | External 5 V + | Do not power the servo from the Mega’s 5V pin |
| SG90 servo | Brown (GND) | External 5 V − and Mega GND | Grounds must be common |
| Entry IR sensor | OUT | D22 | LOW when a car is in front |
| Exit IR sensor | OUT | D23 | LOW when a car is in front |
| Slot 1–4 IR sensors | OUT | D24, D25, D26, D27 | One sensor per bay |
| All IR sensors | VCC / GND | 5V / GND | Adjust the blue pot for 3–8 cm range |
| Green LED | Anode via 220 Ω | D30 | Cathode to GND |
| Red LED | Anode via 220 Ω | D31 | Cathode to GND |
| Buzzer | + / − | D32 / GND | Active buzzer |
Connection Diagram
The illustration below is also the featured image and shows the overall layout of the build. Follow the pin-accurate drawing under it, which matches the wiring table, when you connect the wires.
Libraries to Install
- MFRC522 by GithubCommunity (the miguelbalboa library) – Arduino IDE, Tools, Manage Libraries, search MFRC522.
- LiquidCrystal I2C by Frank de Brabander.
- Servo, SPI and Wire come with the Arduino IDE.
Arduino Mega Smart Parking Code
Select Tools, Board, Arduino Mega or Mega 2560 and the right COM port, then upload. The sketch compiles to about 10.8 KB, so there is lots of room left on the Mega for extra features.
/*
  Arduino Mega 2560 Smart Parking System
  RFID-controlled entry gate + free exit + 4 slot sensors + 16x2 I2C LCD

  Libraries (Library Manager):
    - MFRC522 by GithubCommunity (miguelbalboa)
    - LiquidCrystal I2C by Frank de Brabander
    - Servo (built in)

  Wiring summary
    RC522  : SDA(SS)->53, SCK->52, MOSI->51, MISO->50, RST->49, 3.3V, GND
    LCD I2C: SDA->20, SCL->21, VCC->5V, GND
    Servo  : signal->9, power from separate 5 V supply (common GND)
    IR gate: entry->22, exit->23
    IR slot: slot1..slot4 -> 24..27
    LEDs   : green->30, red->31 (each through 220 ohm)   Buzzer -> 32
*/

#include <SPI.h>
#include <MFRC522.h>
#include <Wire.h>
#include <LiquidCrystal_I2C.h>
#include <Servo.h>

// ---------- pins ----------
#define RFID_SS   53
#define RFID_RST  49
#define SERVO_PIN 9
#define IR_ENTRY  22
#define IR_EXIT   23
#define LED_GREEN 30
#define LED_RED   31
#define BUZZER    32
const uint8_t SLOT_PINS[4] = {24, 25, 26, 27};
const uint8_t NUM_SLOTS = 4;

// ---------- settings ----------
#define GATE_CLOSED_ANGLE 0     // barrier down
#define GATE_OPEN_ANGLE   90    // barrier up
#define IR_ACTIVE LOW           // most IR obstacle modules pull OUT low when they see an object
#define GATE_TIMEOUT_MS 15000UL // close the gate anyway after 15 s
#define CLEAR_DELAY_MS   1500UL // wait after the car passes before closing

// Authorised card UIDs. Scan your cards, read the UID on Serial Monitor, then put it here.
const byte AUTH_UIDS[][4] = {
  {0xDE, 0xAD, 0xBE, 0xEF},   // example card 1 (replace)
  {0x12, 0x34, 0x56, 0x78}    // example card 2 (replace)
};
const uint8_t NUM_UIDS = sizeof(AUTH_UIDS) / sizeof(AUTH_UIDS[0]);

MFRC522 rfid(RFID_SS, RFID_RST);
LiquidCrystal_I2C lcd(0x27, 16, 2);   // try 0x3F if the screen stays blank
Servo gate;

int lastFree = -1;
bool prompted = false;    // "scan your card" already on screen

// ---------- helpers ----------
bool irSees(uint8_t pin) { return digitalRead(pin) == IR_ACTIVE; }

int countFreeSlots() {
  int freeSlots = 0;
  for (uint8_t i = 0; i < NUM_SLOTS; i++) {
    if (!irSees(SLOT_PINS[i])) freeSlots++;    // no car above the sensor = free
  }
  return freeSlots;
}

void beep(int ms) {
  digitalWrite(BUZZER, HIGH);
  delay(ms);
  digitalWrite(BUZZER, LOW);
}

// Line 1: free count, line 2: which slots are taken (X) or free (O)
void showStatus(int freeSlots) {
  lcd.clear();
  lcd.setCursor(0, 0);
  if (freeSlots == 0) {
    lcd.print("  PARKING FULL  ");
  } else {
    lcd.print("Free slots: ");
    lcd.print(freeSlots);
    lcd.print("/");
    lcd.print(NUM_SLOTS);
  }
  lcd.setCursor(0, 1);
  for (uint8_t i = 0; i < NUM_SLOTS; i++) {
    lcd.print("S");
    lcd.print(i + 1);
    lcd.print(irSees(SLOT_PINS[i]) ? "X " : "O ");
  }
  digitalWrite(LED_GREEN, freeSlots > 0 ? HIGH : LOW);
  digitalWrite(LED_RED,   freeSlots > 0 ? LOW  : HIGH);
}

void showMessage(const char *l1, const char *l2) {
  lcd.clear();
  lcd.setCursor(0, 0); lcd.print(l1);
  lcd.setCursor(0, 1); lcd.print(l2);
}

// Open the barrier, wait for the car to pass the given sensor, then close it
void passCar(uint8_t sensorPin) {
  gate.write(GATE_OPEN_ANGLE);
  unsigned long start = millis();
  // wait until the car reaches/passes the sensor (or time out)
  while (irSees(sensorPin) && millis() - start < GATE_TIMEOUT_MS) delay(20);
  delay(CLEAR_DELAY_MS);
  gate.write(GATE_CLOSED_ANGLE);
  lastFree = -1;            // force a display refresh
}

// Returns true if the card UID is in the allowed list
bool cardAllowed(const MFRC522::Uid &uid) {
  if (uid.size < 4) return false;
  for (uint8_t c = 0; c < NUM_UIDS; c++) {
    bool match = true;
    for (uint8_t b = 0; b < 4; b++) {
      if (uid.uidByte[b] != AUTH_UIDS[c][b]) { match = false; break; }
    }
    if (match) return true;
  }
  return false;
}

void printUid(const MFRC522::Uid &uid) {
  Serial.print("Card UID:");
  for (byte i = 0; i < uid.size; i++) {
    Serial.print(uid.uidByte[i] < 0x10 ? " 0x0" : " 0x");
    Serial.print(uid.uidByte[i], HEX);
  }
  Serial.println();
}

// ---------- setup ----------
void setup() {
  Serial.begin(9600);
  pinMode(IR_ENTRY, INPUT);
  pinMode(IR_EXIT, INPUT);
  for (uint8_t i = 0; i < NUM_SLOTS; i++) pinMode(SLOT_PINS[i], INPUT);
  pinMode(LED_GREEN, OUTPUT);
  pinMode(LED_RED, OUTPUT);
  pinMode(BUZZER, OUTPUT);

  gate.attach(SERVO_PIN);
  gate.write(GATE_CLOSED_ANGLE);

  SPI.begin();
  rfid.PCD_Init();

  lcd.init();
  lcd.backlight();
  showMessage(" Smart Parking ", "  Starting...  ");
  delay(1500);
}

// ---------- main loop ----------
void loop() {
  int freeSlots = countFreeSlots();
  if (freeSlots != lastFree) {        // redraw only when something changes
    showStatus(freeSlots);
    lastFree = freeSlots;
  }

  // 1) Car leaving: exit sensor opens the gate with no card needed
  if (irSees(IR_EXIT)) {
    showMessage("   Thank you!   ", "  Drive safely  ");
    passCar(IR_EXIT);
    return;
  }

  // 2) Car arriving: wait for a card scan while the car is at the entry sensor
  if (irSees(IR_ENTRY)) {
    if (freeSlots == 0) {
      showMessage("  PARKING FULL  ", " Sorry, no space");
      beep(150); delay(150); beep(150);
      delay(1500);
      lastFree = -1;
      return;
    }
    if (!prompted) {                  // draw the prompt once, not every loop
      showMessage("Welcome! Please ", "scan your card  ");
      prompted = true;
    }
    if (rfid.PICC_IsNewCardPresent() && rfid.PICC_ReadCardSerial()) {
      printUid(rfid.uid);
      if (cardAllowed(rfid.uid)) {
        showMessage(" Access granted ", " Gate opening.. ");
        beep(100);
        passCar(IR_ENTRY);
        prompted = false;
      } else {
        showMessage(" Access denied  ", " Unknown card   ");
        beep(800);
        delay(1200);
        prompted = false;             // show the prompt again
        lastFree = -1;
      }
      rfid.PICC_HaltA();
      rfid.PCD_StopCrypto1();
    }
    delay(100);
    return;
  }

  // car drove away from the entry without a card: go back to the status screen
  if (prompted) { prompted = false; lastFree = -1; return; }

  // 3) Idle: still print UIDs of any scanned card, handy for enrolling new cards
  if (rfid.PICC_IsNewCardPresent() && rfid.PICC_ReadCardSerial()) {
    printUid(rfid.uid);
    rfid.PICC_HaltA();
    rfid.PCD_StopCrypto1();
  }
  delay(50);
}
Adding Your Own RFID Cards
- Upload the sketch and open the Serial Monitor at 9600 baud.
- With no car at the entry sensor, tap each card on the reader. The monitor prints a line like
Card UID: 0xA3 0x5F 0x12 0x9C. - Copy the first four bytes into the
AUTH_UIDSlist, for example{0xA3, 0x5F, 0x12, 0x9C}. Add one line per card. - Upload again. Those cards now open the gate.
Testing and Calibration
- Turn each IR module’s blue potentiometer until its second LED lights only when your hand or a toy car is 3–8 cm away.
- Check the LCD. With all bays empty it should show Free slots: 4/4 and S1O S2O S3O S4O.
- Cover the slot sensors one by one and watch the count drop. With all four covered, the red LED turns on and the LCD shows PARKING FULL.
- Uncover a bay, block the entry sensor and scan an enrolled card. The barrier should rise, then fall 1.5 seconds after you remove your hand.
- Block the exit sensor. The gate should open without any card.
Troubleshooting
| Problem | Fix |
|---|---|
| LCD backlight is on but no text | Turn the contrast pot on the I2C backpack. If it is still blank, change the address in the code from 0x27 to 0x3F. |
| RFID cards are never read | Check that SDA goes to D53 (not D10 as on the Uno), that the RC522 is on 3.3 V, and that the jumper wires are short. |
| Board resets when the servo moves | Power the servo from a separate 5 V supply and join its ground to the Mega’s GND. |
| A bay always shows occupied | Turn that sensor’s pot to reduce its range, or shield it from sunlight, which can trigger IR modules. |
| Logic is inverted (free shows X) | Your IR modules output HIGH on detection. Change IR_ACTIVE from LOW to HIGH. |
| Gate moves the wrong way | Swap the values of GATE_OPEN_ANGLE and GATE_CLOSED_ANGLE. |
Ideas to Extend This Project
- Add an ESP8266 or ESP32 on Serial1 (pins 18/19) to show free slots on a phone web page.
- Log entry and exit times with a DS3231 RTC and a microSD card module for a simple parking ticket system.
- Scale it up to more bays; the Mega still has more than 20 free digital pins.
- Replace bay IR sensors with HC-SR04 ultrasonic sensors for real cars in an outdoor setup.
FAQ
Can I use an Arduino Uno instead of the Mega? Only with fewer parts. The Uno does not have enough free pins for six IR sensors, SPI, I2C, a servo, two LEDs and a buzzer, which is why this build uses the Mega 2560.
Will any RFID card work? The RC522 reads 13.56 MHz MIFARE cards and tags, such as the blue key fob and white card that come with it. It cannot read 125 kHz EM4100 cards.
Is this suitable for a real car park? It is a working model. For a real gate you would use a proper motorised barrier, weatherproof sensors and a relay or motor driver instead of the SG90.
Related Projects
- ESP32 RFID Door Lock with RC522
- Arduino Ultrasonic Distance Meter with HC-SR04 and LCD
- Arduino Clap Switch with KY-038 Sound Sensor
- IR Remote Controlled Stepper Motor with Arduino
Browse more Arduino Projects on Arduino Project Hub.
2 thoughts on “Arduino Mega Smart Parking System with RFID, IR Sensors & Servo Gate”