
Build a Raspberry Pi Pico 4-DOF robot arm in MicroPython: steer the base, shoulder, elbow and gripper servos with two joysticks, record up to 20 poses to flash, and play them back in a smooth loop while an OLED shows every angle.
Need it ready-made? Buy Ready Project
A small desktop robot arm is one of the most satisfying builds in electronics: you move two joysticks and the arm turns, reaches and picks things up. This Raspberry Pi Pico robot arm goes one step further. Press Record at each position you like, press Play, and the arm repeats the whole sequence by itself in a smooth, endless loop – a simple pick-and-place “teach and repeat” robot like the ones used in factories, only on your desk.
Four micro servos move the base, shoulder, elbow and gripper. The Pico reads the joysticks, limits every joint to a safe range, eases the servos so they never jump, saves the recorded poses to a file in its flash memory, and shows all four angles on an SSD1306 OLED. The servos run from their own 5 V 3 A supply, which is the single most important detail for a reliable arm.
How It Works
- Servo control: a hobby servo expects a pulse every 20 ms (50 Hz). A 0.5 ms pulse means 0°, 1.5 ms means 90° and 2.5 ms means 180°. The Pico has hardware PWM on every GPIO, so
PWM.duty_ns()on GP16–GP19 sets each servo angle exactly without any extra driver board. The 3.3 V signal level is enough for SG90 and MG90S servos. - Three ADC pins, four joints: the Pico exposes only three analog inputs (GP26, GP27, GP28). Joystick 1 uses both axes – left/right turns the base, up/down moves the shoulder. Joystick 2 uses its up/down axis for the elbow. The gripper does not need analog control, so it uses the two joystick push switches: press joystick 1 to open the gripper a little at a time, press joystick 2 to close it. This keeps every input on a real, correctly wired pin with no multiplexer.
- Smooth motion: the joysticks never set an angle directly. Each 20 ms loop, the stick position adds a small amount to a target angle (more deflection = faster), and the real servo angle is allowed to move at most 1.2° toward the target. A dead zone around the stick centre stops drift, and the centre value of each stick is measured at start-up.
- Record: a short press on Record stores the four current angles as one pose (up to 20). The list is written to
poses.jsonon the Pico’s flash straight away, so it survives power-off. Holding Record for 2 seconds clears all poses. - Playback: Play starts a loop through all poses. Between two poses all four joints move together over 1.2 seconds with “smoothstep” easing (slow start, fast middle, slow stop), then the arm holds for 0.4 seconds. Press Play again to stop and take back joystick control from the current position.
- Feedback: the OLED shows every joint angle with a small bar, the mode (MAN or PLAY) and how many poses are stored. The buzzer beeps on each saved pose and on errors, and the status LED toggles at each playback step.
Components Required
- Raspberry Pi Pico (or Pico W / Pico 2) with headers – 1
- SG90 or MG90S micro servo (MG90S metal gear is better for shoulder and elbow) – 4
- 4-DOF acrylic or 3D-printed mini robot arm kit (sized for SG90/MG90S) – 1
- Dual-axis analog joystick module (KY-023 / PS2 type, with push switch) – 2
- 12 mm tactile push buttons (Record and Play) – 2
- 0.96 inch SSD1306 I2C OLED display, 128×64 – 1
- Passive buzzer with 100 Ω series resistor – 1
- 5 mm LED with 330 Ω resistor (status) – 1
- 5 V 3 A DC adapter with DC jack breakout – 1
- 1000 µF 10 V (or higher) electrolytic capacitor – 1
- 1N5819 Schottky diode (only if the Pico runs from the 5 V supply) – 1
- Breadboard or perfboard, servo extension leads and jumper wires – 1 set
Wiring Table
| Module pin | Pico pin | Notes |
|---|---|---|
| Base servo signal (orange) | GP16 (pin 21) | PWM slice 0A, 50 Hz |
| Shoulder servo signal | GP17 (pin 22) | PWM slice 0B |
| Elbow servo signal | GP18 (pin 24) | PWM slice 1A |
| Gripper servo signal | GP19 (pin 25) | PWM slice 1B |
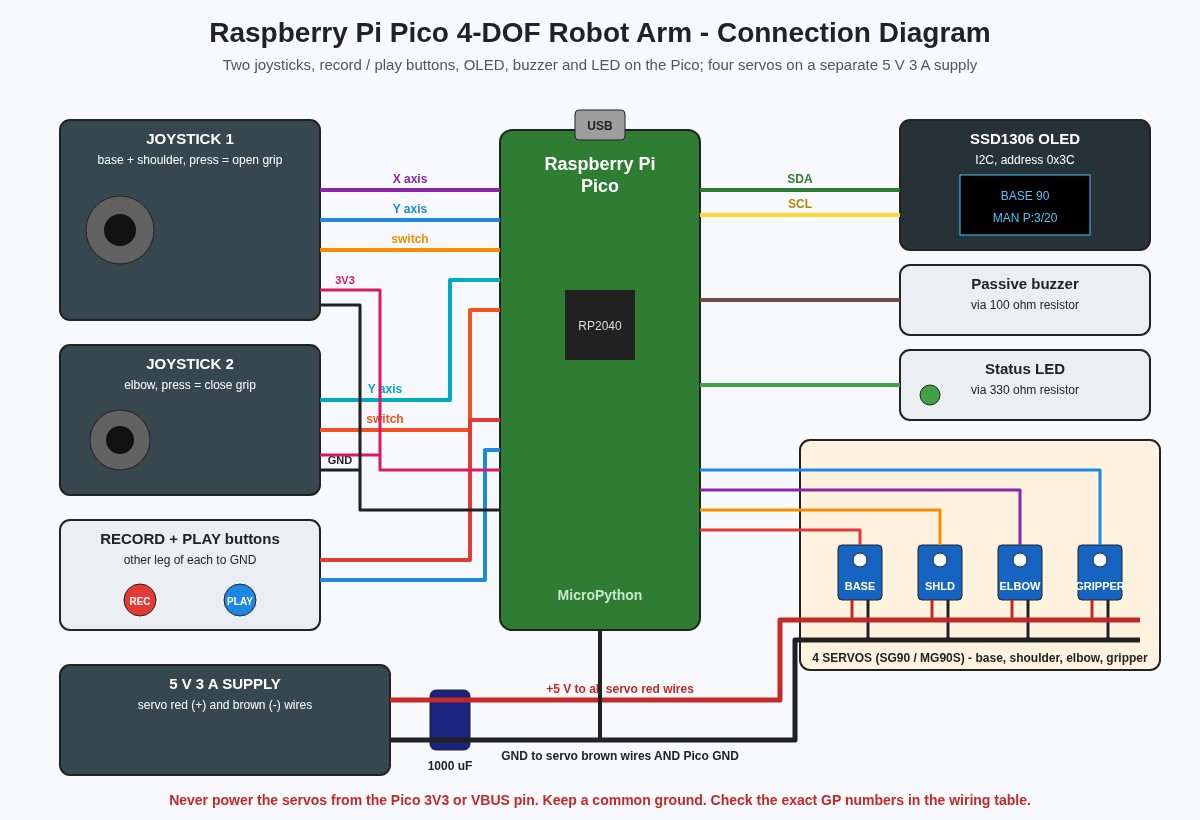
| All servo red (+) wires | 5 V 3 A supply + | Never from the Pico 3V3 or VBUS pin |
| All servo brown (–) wires | 5 V supply – and Pico GND | Common ground is required for the signal to work |
| 1000 µF capacitor | Across servo 5 V and GND | Long leg (+) to 5 V; absorbs current spikes |
| Joystick 1 VRx | GP26 / ADC0 (pin 31) | Base left / right |
| Joystick 1 VRy | GP27 / ADC1 (pin 32) | Shoulder up / down |
| Joystick 1 SW | GP14 (pin 19) | Gripper open (internal pull-up) |
| Joystick 2 VRy | GP28 / ADC2 (pin 34) | Elbow up / down |
| Joystick 2 VRx | Not connected | Free axis (no fourth ADC pin) |
| Joystick 2 SW | GP15 (pin 20) | Gripper close (internal pull-up) |
| Both joysticks +5V / VCC | 3V3 OUT (pin 36) | Power the pots from 3.3 V so the ADC never sees more than 3.3 V |
| Both joysticks GND | GND (pin 38) | |
| Record button | GP10 (pin 14) and GND | Pressed = LOW |
| Play button | GP11 (pin 15) and GND | Pressed = LOW |
| Status LED anode | GP12 (pin 16) via 330 Ω | Cathode to GND |
| Passive buzzer + | GP13 (pin 17) via 100 Ω | Buzzer – to GND |
| OLED VCC / GND | 3V3 OUT (pin 36) / GND | Check the pin order printed on your module |
| OLED SDA / SCL | GP4 (pin 6) / GP5 (pin 7) | I2C0, address 0x3C |
| 5 V supply + (optional) | VSYS (pin 39) via 1N5819 | Lets the Pico run without USB; the diode protects the PC if USB is plugged in too |
Connection Diagram
The illustration near the top of this post shows how the boards, joysticks, servos and the separate power supply fit together. The drawing below lists every Pico pin with its physical pin number, and matches the wiring table and the code exactly.
Power Supply Notes
- Each SG90 can draw 500–700 mA when it starts moving or stalls, and an MG90S even more. Four of them easily need 2–3 A in short bursts, which is why a 5 V 3 A adapter is used. Powering servos from the Pico or a USB port causes brown-outs, random resets and jittering.
- Join the supply minus to the Pico GND. Without this common ground the servos cannot “see” the signal pulses.
- Place the 1000 µF capacitor close to the servo power rail. Use short, thick wires (22 AWG or thicker) for the servo 5 V and GND.
- While programming, the Pico can stay on USB with the servos on the adapter. For stand-alone use, feed the 5 V supply into VSYS through the 1N5819 diode.
Code
Flash the latest MicroPython UF2 for your board (hold BOOTSEL while plugging in the Pico and drop the file on the RPI-RP2 drive). In Thonny, open Tools → Manage packages, search for ssd1306 and install it (or copy the ssd1306.py driver from the micropython-lib repository to the Pico). Then save the code below to the Pico as main.py so the arm starts automatically on power-up. The project needs no Wi-Fi, so it also runs on a plain Pico. The code was syntax-checked and the record/playback logic was tested in a simulation before publishing.
# Raspberry Pi Pico 4-DOF Robot Arm - Joysticks, Record & Playback, OLED
# Base, shoulder, elbow and gripper servos (SG90 / MG90S) on a separate 5 V 3 A supply
# Arduino Project Hub - ardiunoprojecthub.online
# Needs ssd1306.py on the Pico (Thonny: Tools > Manage packages > "ssd1306")
# Save this file to the Pico as main.py

from machine import Pin, PWM, ADC, I2C
import time, json
import ssd1306

# ---------- pin map (matches the wiring table) ----------
SERVO_PINS = (16, 17, 18, 19)          # base, shoulder, elbow, gripper signal wires
NAMES = ("BASE", "SHLD", "ELBW", "GRIP")
# per-joint limits in degrees: (min, max, home). Tune these for your arm!
LIMITS = ((0, 180, 90),     # base
          (15, 165, 90),    # shoulder
          (20, 160, 90),    # elbow
          (30, 110, 70))    # gripper: 30 = open, 110 = closed (check yours)

JOY_BASE = ADC(26)        # ADC0 <- joystick 1 VRx  (turn left / right)
JOY_SHLD = ADC(27)        # ADC1 <- joystick 1 VRy  (shoulder up / down)
JOY_ELBW = ADC(28)        # ADC2 <- joystick 2 VRy  (elbow up / down)
# The Pico has only three free ADC pins, so the gripper uses the two
# joystick push switches: joystick 1 SW = open, joystick 2 SW = close.
SW_OPEN = Pin(14, Pin.IN, Pin.PULL_UP)
SW_CLOSE = Pin(15, Pin.IN, Pin.PULL_UP)
BTN_REC = Pin(10, Pin.IN, Pin.PULL_UP)     # short press = store pose, hold 2 s = clear all
BTN_PLAY = Pin(11, Pin.IN, Pin.PULL_UP)    # start / stop playback loop
LED = Pin(12, Pin.OUT, value=0)            # status LED (330 ohm to GND)
buzzer = PWM(Pin(13))                      # passive buzzer through 100 ohm
buzzer.duty_u16(0)

i2c = I2C(0, sda=Pin(4), scl=Pin(5), freq=400000)
oled = ssd1306.SSD1306_I2C(128, 64, i2c)

# ---------- settings ----------
PULSE_MIN_NS = 500_000     # pulse width for 0 degrees (0.5 ms)
PULSE_MAX_NS = 2_500_000   # pulse width for 180 degrees (2.5 ms)
DEADZONE = 4000            # ignore small stick movement around the centre (of 65535)
JOG_SPEED = 2.0            # max degrees per 20 ms loop at full stick deflection
GRIP_SPEED = 1.5           # degrees per loop while a gripper switch is held
SMOOTH_STEP = 1.2          # max degrees each servo may move per loop (smooth motion)
MAX_POSES = 20             # how many poses can be recorded
PLAY_MOVE_MS = 1200        # travel time between two poses during playback
PLAY_HOLD_MS = 400         # pause at each pose
POSE_FILE = "poses.json"
LOOP_MS = 20

# ---------- servos ----------
servos = []
for pin in SERVO_PINS:
    s = PWM(Pin(pin))
    s.freq(50)             # standard 50 Hz hobby servo signal (20 ms frame)
    servos.append(s)


def write_servo(i, angle):
    lo, hi, _ = LIMITS[i]
    angle = max(lo, min(hi, angle))
    ns = PULSE_MIN_NS + int((PULSE_MAX_NS - PULSE_MIN_NS) * angle / 180)
    servos[i].duty_ns(ns)


current = [float(l[2]) for l in LIMITS]   # where each servo is now
target = list(current)                     # where each servo should go
for i in range(4):
    write_servo(i, current[i])


def smooth_update():
    """Move every servo a small step toward its target (no sudden jumps)."""
    for i in range(4):
        d = target[i] - current[i]
        if d > SMOOTH_STEP:
            d = SMOOTH_STEP
        elif d < -SMOOTH_STEP:
            d = -SMOOTH_STEP
        current[i] += d
        write_servo(i, current[i])


# ---------- helpers ----------
def beep(freq=1500, ms=60):
    buzzer.freq(freq)
    buzzer.duty_u16(20000)
    time.sleep_ms(ms)
    buzzer.duty_u16(0)


def clamp_target(i):
    lo, hi, _ = LIMITS[i]
    target[i] = max(lo, min(hi, target[i]))


def stick(adc, centre):
    """Return -1.0 ... +1.0 from a joystick axis, 0 inside the dead zone."""
    v = adc.read_u16() - centre
    if -DEADZONE < v < DEADZONE:
        return 0.0
    if v > 0:
        return (v - DEADZONE) / (65535 - centre - DEADZONE)
    return (v + DEADZONE) / (centre - DEADZONE)


def calibrate_centre(adc):
    """Average 32 readings at start-up (do not touch the sticks)."""
    total = 0
    for _ in range(32):
        total += adc.read_u16()
        time.sleep_ms(2)
    return total // 32


def load_poses():
    try:
        with open(POSE_FILE) as f:
            data = json.load(f)
        return [[float(a) for a in pose[:4]] for pose in data][:MAX_POSES]
    except (OSError, ValueError, TypeError):
        return []             # first run: no file yet


def save_poses(poses):
    with open(POSE_FILE, "w") as f:
        json.dump([[round(a, 1) for a in pose] for pose in poses], f)


def show(mode, poses, msg=""):
    oled.fill(0)
    oled.text("PICO ROBOT ARM", 8, 0)
    oled.hline(0, 10, 128, 1)
    for i in range(4):
        y = 14 + i * 9
        oled.text(NAMES[i], 0, y)
        oled.text("{:3d}".format(int(current[i])), 40, y)
        bar = int(current[i] * 52 / 180)           # small angle bar
        oled.rect(70, y + 1, 54, 6, 1)
        oled.fill_rect(71, y + 2, bar, 4, 1)
    oled.text("{} P:{}/{}".format(mode, len(poses), MAX_POSES), 0, 50)
    if msg:
        oled.fill_rect(0, 56, 128, 8, 0)
        oled.text(msg[:16], 0, 56)
    oled.show()


class Button:
    """Debounced button with short-press and long-press detection."""
    def __init__(self, pin, long_ms=2000):
        self.pin = pin
        self.long_ms = long_ms
        self.down_at = None
        self.long_done = False

    def poll(self):
        """Returns 'short', 'long' or None."""
        pressed = self.pin.value() == 0
        now = time.ticks_ms()
        if pressed and self.down_at is None:
            self.down_at = now
            self.long_done = False
        elif pressed and not self.long_done and time.ticks_diff(now, self.down_at) >= self.long_ms:
            self.long_done = True
            return "long"
        elif not pressed and self.down_at is not None:
            held = time.ticks_diff(now, self.down_at)
            self.down_at = None
            if not self.long_done and held >= 40:      # 40 ms debounce
                return "short"
        return None


# ---------- start-up ----------
show("START", [], "centre sticks...")
c_base = calibrate_centre(JOY_BASE)
c_shld = calibrate_centre(JOY_SHLD)
c_elbw = calibrate_centre(JOY_ELBW)
poses = load_poses()
rec_btn = Button(BTN_REC)
play_btn = Button(BTN_PLAY)
mode = "MAN"            # MAN = joystick control, PLAY = playback loop
play_index = 0
seg_start = 0
seg_from = list(current)
holding = False
msg = "loaded {} poses".format(len(poses)) if poses else "ready"
beep(1200, 80)
beep(1800, 80)
last_screen = 0

while True:
    t0 = time.ticks_ms()
    r = rec_btn.poll()
    pl = play_btn.poll()

    # ----- play button: start / stop playback -----
    if pl == "short":
        if mode == "MAN":
            if len(poses) >= 1:
                mode = "PLAY"
                play_index = 0
                seg_from = list(current)
                seg_start = t0
                holding = False
                LED.value(1)
                msg = "playing"
                beep(2000, 60)
            else:
                msg = "no poses!"
                beep(400, 200)
        else:
            mode = "MAN"
            target[:] = current         # stop where the arm is now
            LED.value(0)
            msg = "stopped"
            beep(800, 60)

    # ----- record button -----
    if r == "short" and mode == "MAN":
        if len(poses) < MAX_POSES:
            poses.append([round(a, 1) for a in current])
            save_poses(poses)
            msg = "pose {} saved".format(len(poses))
            LED.value(1)
            beep(1500, 50)
            LED.value(0)
        else:
            msg = "memory full"
            beep(400, 200)
    elif r == "long" and mode == "MAN":
        poses = []
        save_poses(poses)
        msg = "all cleared"
        beep(600, 300)

    if mode == "MAN":
        # joystick jog: the further the stick, the faster the joint moves
        target[0] += stick(JOY_BASE, c_base) * JOG_SPEED
        target[1] += stick(JOY_SHLD, c_shld) * JOG_SPEED
        target[2] += stick(JOY_ELBW, c_elbw) * JOG_SPEED
        if SW_OPEN.value() == 0:
            target[3] -= GRIP_SPEED
        if SW_CLOSE.value() == 0:
            target[3] += GRIP_SPEED
        for i in range(4):
            clamp_target(i)
        smooth_update()
    else:
        # playback: ease from the previous pose to the next one, then hold
        goal = poses[play_index]
        el = time.ticks_diff(t0, seg_start)
        if not holding:
            k = min(1.0, el / PLAY_MOVE_MS)
            k = k * k * (3 - 2 * k)             # smoothstep easing: slow-fast-slow
            for i in range(4):
                current[i] = seg_from[i] + (goal[i] - seg_from[i]) * k
                write_servo(i, current[i])
            if el >= PLAY_MOVE_MS:
                holding = True
                seg_start = t0
        elif el >= PLAY_HOLD_MS:
            holding = False
            seg_from = list(goal)
            seg_start = t0
            play_index = (play_index + 1) % len(poses)     # loop forever
            LED.toggle()
        target[:] = current
        msg = "pose {}/{}".format(play_index + 1, len(poses))

    if time.ticks_diff(t0, last_screen) > 150:     # refresh OLED ~6 times a second
        show(mode, poses, msg)
        last_screen = t0

    wait = LOOP_MS - time.ticks_diff(time.ticks_ms(), t0)
    if wait > 0:
        time.sleep_ms(wait)
Calibration and Testing
- Before fitting the horns: power everything once without the servo horns attached. At start-up every servo goes to its home angle (90°, gripper 70°). Now fit the horns so the arm stands straight up and the gripper is half open.
- Keep the sticks still at power-up: the first half second measures the joystick centre. If a joint creeps on its own, restart without touching the sticks, or raise
DEADZONE. - Set safe limits: move each joint slowly to its mechanical end with the joystick and read the angle on the OLED. Enter values a few degrees inside these ends in
LIMITS. This stops servos from pushing against the frame, which overheats them. - Gripper: find the angle where the jaws just close on an object and use it as the maximum for the gripper, so it grips without stalling. If open/close are reversed on your kit, swap the
-=and+=lines forSW_OPENandSW_CLOSE. - Direction: if a stick moves a joint the opposite way you expect, put a minus sign in front of that
stick(...)call. - Teach a sequence: move to a pose, press Record (short beep), repeat for every step, then press Play. Change
PLAY_MOVE_MSandPLAY_HOLD_MSfor faster or slower playback.
Troubleshooting
| Problem | Fix |
|---|---|
| Pico resets or the OLED goes blank when the arm moves | The servos are pulling the supply down. Use a separate 5 V 3 A supply, add the 1000 µF capacitor and make sure the servos are not powered from the Pico. |
| Servos jitter or do not move at all | The grounds are not joined. Connect the 5 V supply minus to a Pico GND pin. Also check each signal wire is on GP16–GP19 in the right order. |
| A joint moves on its own | Joystick drift. Restart with the sticks centred so the centre is measured again, or raise DEADZONE to 6000. |
| One joystick axis does nothing | Check VRx/VRy go to GP26, GP27 and GP28 and that the joystick VCC pin is on 3V3 OUT, not on VBUS. Joystick 2’s VRx is unused on purpose. |
| ImportError: no module named ‘ssd1306’ | The OLED driver is not on the Pico. Install the ssd1306 package in Thonny or copy ssd1306.py to the Pico’s root folder. |
| OSError: [Errno 5] EIO at start-up | The OLED is not found on I2C. Check SDA on GP4, SCL on GP5 and the module address (0x3C is used). |
| Servo buzzes and gets hot at one end | It is pressing against a mechanical stop. Reduce the max or raise the min angle for that joint in LIMITS. |
| Poses are lost after unplugging | The code must run from the Pico’s flash as main.py; check that poses.json appears on the Pico in Thonny’s file panel. |
| “no poses!” when pressing Play | Record at least one pose first. Two or more poses are needed to see the arm move between them. |
Ideas to Extend
- Add a PCA9685 16-channel servo board on I2C to build a 6-DOF arm with wrist rotation.
- Use a CD4051 analog multiplexer on one ADC pin to read both axes of both joysticks plus extra potentiometers.
- Use a Pico W to store several named sequences and start them from a phone web page.
- Add an HC-SR04 sensor so the arm starts its pick-and-place loop only when an object is placed in front of it.